Welcome to our divine confectionary, where we unveil a heavenly dessert that will transport your taste buds to cloud nine – Mini Angel Food Cake with Whipped Cream and Berries. Prepare to be enchanted by the delicate texture and airy sweetness of this classic treat. Our recipe combines the lightness of angel food cake with the indulgence of fluffy whipped cream and the vibrant burst of fresh berries. Each bite is a symphony of flavors and textures that will leave you craving for more. Whether you’re seeking a delightful dessert for an intimate gathering or a simple pleasure to savor on a sunny afternoon, these mini angel food cakes are the perfect choice. Join us as we guide you through the process of creating these ethereal delights that will elevate any occasion. Let’s embark on this delightful journey and experience the blissful combination of tender cake, luscious cream, and juicy berries.
Angel food cake is a miracle of culinary science. Lighter than air, it is what a cloud would taste like if baked into a cake (which is likely why it is called angel food cake in the first place). Subtly sweet and scented with vanilla and almond, angel food cake is the perfect base for freshly whipped cream and ripe seasonal fruit.
The key to the otherworldly texture of angel food cake is air, and the key to incorporating that air (in the form of whipped egg whites) is the whisk attachment on the KitchenAid® Stand Mixer. As the cake bakes, the liquid in the whipped egg whites turns to steam, and it’s that steam that makes the cake rise (whereas other cakes use chemical leavening such as baking powder).
I’m going to show you how to make an incredible angel food cake.

Egg whites always whip up best in a metal bowl, so put away the pretty glass or ceramic bowl for this one. Also be sure your bowl is completely clean—any trace of grease or fat will prevent your whites from whipping up properly. Fresh egg whites at cool room temperature (about 60ºF) will hold the best structure for your cake, so separate your eggs and leave the whites at room temperature for about 1 hour before you begin.
Whip your room-temperature egg whites with the cream of tartar until frothy. Then slowly whisk in 1/4 cup of the granulated sugar.

Continue to whisk on medium-high to high speed (speed 8 feels just right to me) until the egg whites hold medium peaks. This shouldn’t take more than 3 to 5 minutes. Don’t walk away from your Stand Mixer, as once over-beaten, egg whites cannot be saved.

Medium peaks fall somewhere between soft peaks and stiff peaks. Detach and lift the whisk blade out of the bowl and watch what happens. Larger spikes will gently fold back onto themselves, while smaller points should somewhat hold their shape. It’s ok if your peaks are slightly softer, there is a bit of wiggle room as the specific stiffness is somewhat subjective, but try not to over-whip the whites as they will be harder to incorporate into the dry ingredients.

Sprinkle about half of the sifted dry ingredients on top of the egg whites and gently fold to incorporate the dry ingredients without deflating the egg whites. Folding involves running a large rubber spatula around the side and under the bottom of the mixture in the bowl, turning the mixture up over itself. Repeat this action, rotating the bowl after every fold so all the dry ingredients are evenly incorporated.

If you are using a full-size angel food cake pan for this recipe (as opposed to minis) you can simply pour the batter into an ungreased pan. For the mini cakes, the batter is too thick and the molds are too small to fill neatly. I found that the easiest way to distribute the batter in the mini pans is to pipe it. Transfer the batter to a zip-top bag. Cut off about 1/2 inch of the corner of the bag, and use that to “pipe” the batter into the cake Pan. You could also use an actual piping bag with a large round tip if you have one.

You want to fill each mold about 2/3 of the way full. Unless you have more than one mini angel food cake pan, you will have leftover batter (try filling some cupcake cups with the leftover batter…a little extra treat for the cook!

Smooth out the tops of the molds using an offset spatula if desired (as any small peaks or mounds will remain in the final baked cake). This step is optional as the top of the cake actually becomes the bottom of the cake in the end.

The mini cakes will be done after about 15 minutes, when the tops are nice and golden brown and a toothpick inserted into the cake comes out clean. If anything, err on the side of overbaking, as it’ll make the cakes easier to remove from the pans than an undercooked cake.

When the cakes come out of the oven, invert the pan and let cool. For a full-size angel food cake pan, you can use a wine bottle to support the pan. For the mini cake pan, I found two upside-down pint glasses strategically placed in between cakes that worked perfectly. Don’t worry, the cakes will not fall out of their molds. Inverting them will prevent them from sinking (resulting in a less-than-ideal dense texture).
After 1 hour, gently run a thin metal spatula around the edges of the cakes as well as around the center column. Do not use a sawing motion, but rather a smooth up and down to release the cake. I found that working one at a time, then inverting the pan and ever so gently twisting the loosened cake worked best. The cake is supposed to stick to the sides (that’s what allows the cake to rise in the first place) so just be patient with it and the cakes will come out with enough finessing.

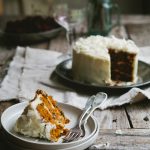
Once the cakes are out, what you do with them is up to you! I personally like to take the shortcake route, topping them with freshly whipped cream that will blow any can/tub out of the water, along with some seasonal fruit and berries. Peaches, figs, or cherries would also be great options. Or you could take a different route entirely and drizzle your cakes with fudge sauce, melted peanut butter, and/or dulce de leche for a truly decadent treat. Angel food cake on its own is very neutrally flavored, so it can really go in any direction that you choose. You can also easily substitute the almond extract for more vanilla or a different flavor such as lemon if desired.

Mini angel food cake topped with homemade whipped cream is a perfect recipe to get to know your Stand Mixer’s whisk attachment. For more techniques and recipes for the whisk attachment and beyond, hop on over to Craftsy and learn to make the most of your Stand Mixer.

Makes 1 large or 8 mini cakes
INGREDIENTS
For cake
3/4 cup sifted cake flour
1/3 cup sifted powdered sugar
1/2 teaspoon fine sea salt
3/4 cup granulated sugar, divided
1 cup (9 ounces) egg whites (from 7 to 8 large eggs), at cool room temperature
1 teaspoon cream of tartar
1 teaspoon vanilla extract
1/2 teaspoon almond extract
For Topping
1 cup heavy whipping cream
1/4 cup granulated sugar
Fresh fruit or berries, for topping (optional)
DIRECTIONS
- Preheat oven to 350ºF.
- Sift cake flour and powdered sugar into a bowl. Add sea salt and 1/2 cup of granulated sugar and set aside.
- Place egg whites in a metal Stand Mixer bowl along with vanilla and almond extracts. Sprinkle over cream of tartar. Fit Stand Mixer with the whisk attachment and whip on medium speed for 30 to 60 seconds or until frothy. With the Stand Mixer running, gradually add the remaining 1/4 cup of sugar. Increase speed to high and whip until egg whites form medium-soft peaks, about 3 to 5 minutes. Unlatch bowl from Stand Mixer base.
- Sprinkle half of the flour mixture over top of beaten egg whites. Gently incorporate with a large rubber spatula using a folding motion so as not to deflate the egg whites. When flour is mostly incorporated, sprinkle over the remaining flour and fold again, thoroughly scraping the sides and bottom of the bowl until just incorporated and no dry ingredients remain.
- Transfer batter to a gallon-sized zip-top bag and seal. Cut off about 1/2 inch of the corner of the bag to form a make-shift piping bag. Pipe batter into an ungreased Cake Pan, filling each cavity about 2/3 of the way full. (If making a full-size angel food cake, simply pour the batter into the ungreased pan, no piping bag necessary). Smooth tops with a small spatula.
- Bake for 18 to 20 minutes (30 to 35 minutes for a full-size cake) until the tops are evenly golden brown and a toothpick or skewer inserted in the middle comes out clean.
- Carefully invert the pan, using pint glasses to support the upside-down pan as needed. Let cool for one hour before gently loosening the edges of the cakes with a thin metal spatula and removing them from pan.
- To make whipped cream, place chilled whipping cream into the metal bowl of a Stand Mixer fitted with the whisk attachment (you can even chill the metal bowl to make the cream more sturdy when whipped). Sprinkle sugar over cream and then whip on medium-high speed until cream forms medium-stiff peaks. Top cakes with a dollop of whipped cream and fresh fruit, as desired.